ansible生产环境使用场景(二)
前言:
生产上新入网的服务器都需要安装prometheus的监控客户端软件,主要步骤有:新建监控用户、拷贝客户端软件、拉起客户端进程、开机自启动。本文记录了使用ansible的role方式批量快速的安装该客户端软件。
本文使用到的主要模块:user、stat、copy、shell、script、lineinfile等。
环境说明:
| 主机名 | 操作系统版本 | ip | ansible version | 备注 |
|---|---|---|---|---|
| ansible | Centos 7.6.1810 | 172.27.34.51 | 2.9.9 | ansible管理服务器 |
| ansible-awx | Centos 7.6.1810 | 172.27.34.50 | / | 被管服务器 |
[root@ansible ~]# cd /etc/ansible/roles[root@ansible roles]# ansible-galaxy init prometheus- Role prometheus was created successfully[root@ansible roles]# tree prometheusprometheus├── defaults│ └── main.yml├── files├── handlers│ └── main.yml├── meta│ └── main.yml├── README.md├── tasks│ └── main.yml├── templates├── tests│ ├── inventory│ └── test.yml└── vars└── main.yml8 directories, 8 files
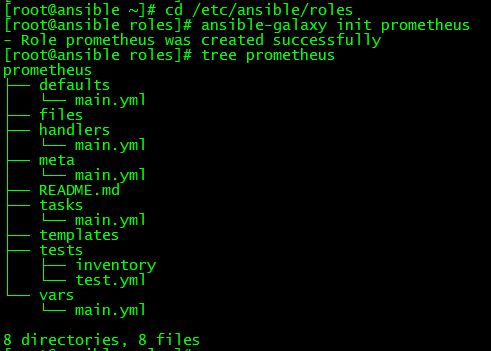
使用ansible-galaxy命令初始化role的目录
[root@ansible ~]# yum -y install python3-pip
[root@ansible ~]# cd /tmp[root@ansible tmp]# pip3 download passlib==1.7.2 -d /tmp/pkg[root@ansible tmp]# more requirements.txtpasslib==1.7.2[root@ansible tmp]# pip3 install --no-index --find-links=./pkg -r requirements.txtWARNING: Running pip install with root privileges is generally not a good idea. Try `pip3 install --user` instead.Collecting passlib==1.7.2 (from -r requirements.txt (line 1))Installing collected packages: passlibSuccessfully installed passlib-1.7.2
生产密码会使用到Python的passlib模块
[root@ansible ~]# python3 -c "from passlib.hash import sha512_crypt; import getpass; print(sha512_crypt.using(rounds=5000).hash(getpass.getpass()))"Password:$6$irgqm/Fea6/O07B7$LJpYtZoKqUkF.pN4D71LX2Cac3TNrF2.1GKGLfaSWxvKupknNLbWNcYym3LuojT3BqUeUCgsrmD/M6FqTx4lK/

输入明文密码会生成密码密文,复制该密码,后面创建用户时会用到。
[root@ansible ansible]# pwd/etc/ansible[root@ansible ansible]# more prometheus.yaml---- hosts: "{{ hostlist }}"gather_facts: noroles:- role: prometheus
[root@ansible ~]# cd /etc/ansible/roles[root@ansible roles]# more prometheus/tasks/main.yml---# tasks file for prometheus# author: loong576- name: user searchshell: id {{ user_name }}register: user_searchignore_errors: true- name: user adduser:name: "{{ user_name }}"shell: "{{ user_bash }}"password: "{{ user_password }}"when: user_search.failed == true- name: file searchstat:path: "{{ file_dest }}/{{ file_src }}"register: file_search- name: copy filescopy:src: "{{ file_src }}"dest: "{{ file_dest }}"mode: 0755when: file_search.stat.exists == false- name: process searchshell: "ps -ef|grep node_exporter |grep -v grep"register: processignore_errors: true- name: install node_exporterenvironment:dest: "{{ file_dest }}"src: "{{ file_src }}"port: "{{ node_port }}"script:startup.shregister: starttags: startwhen: process.failed == true- name: exec when startuplineinfile:dest: /etc/rc.localline: nohup {{ file_dest }}/{{ file_src }} --web.listen-address=:{{ node_port }} >/dev/null &
执行逻辑为:判断被执行主机上有无监控用户,若无则新增;判断被执行主机有无客户端文件,若无则拷贝;判断被执行主机有无客户端进程,若无则拉起;最后设置客户端进程开机自启动。
[root@ansible roles]# more prometheus/defaults/main.yml---# defaults file for prometheususer_name: sysmonitoruser_bash: /bin/bashuser_password: $6$bB7R8JF3U7L7s/3E$fKOQwpoZ7RESfMmX6uqts1gw4yeXniRNctI2JRBRS2/120EgrHCWS3DboiRhO5sN0CjoVxvtAKgeDVQRaPlc0/file_src: node_exporterfile_dest: /home/sysmonitornode_port: 9100
定义监控用户的用户名、shell、密码,客户端执行文件的文件名、文件路径和端口。
[root@ansible roles]# ll prometheus/files/总用量 16512-rw-r--r-- 1 root root 16900416 7月 30 16:04 node_exporter-rwxr--r-- 1 root root 102 7月 31 11:32 startup.sh[root@ansible roles]# more prometheus/files/startup.sh#/bin/bashecho $destecho $srcecho $portnohup $dest/$src --web.listen-address=:$port >/dev/null &
file文件有两个,node_exporter为客户端执行文件,startup.sh为客户端进程拉起脚本。
[root@ansible ansible]# pwd/etc/ansible[root@ansible ansible]# ansible-playbook prometheus.yaml -e hostlist=test50
‘ -e hostlist=test50’指定被执行的主机为test50,即172.27.34.50
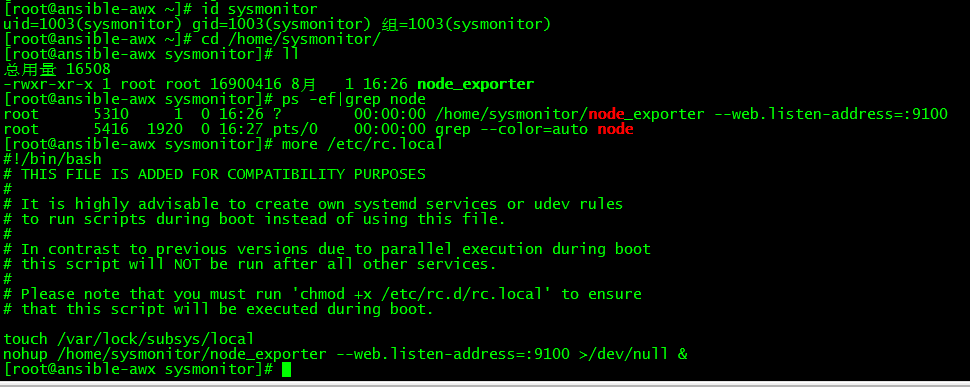
登陆被管主机test50,发现监控用户和监控进程都在且加入到了开机自启动文件中,符合预期。