Bilinear CNN implementation in keras.
This repository is a clean version of BCNN (Bilinear CNN) implementation with keras.
The notebook is totally translated to the structured codes, which would be much more convenient to run with cloud servers, such as AWS, in the background.
Most of the codes are kept as same as the notebook, while some codes are modified for better structure. Also know that some training parameters are changed too.
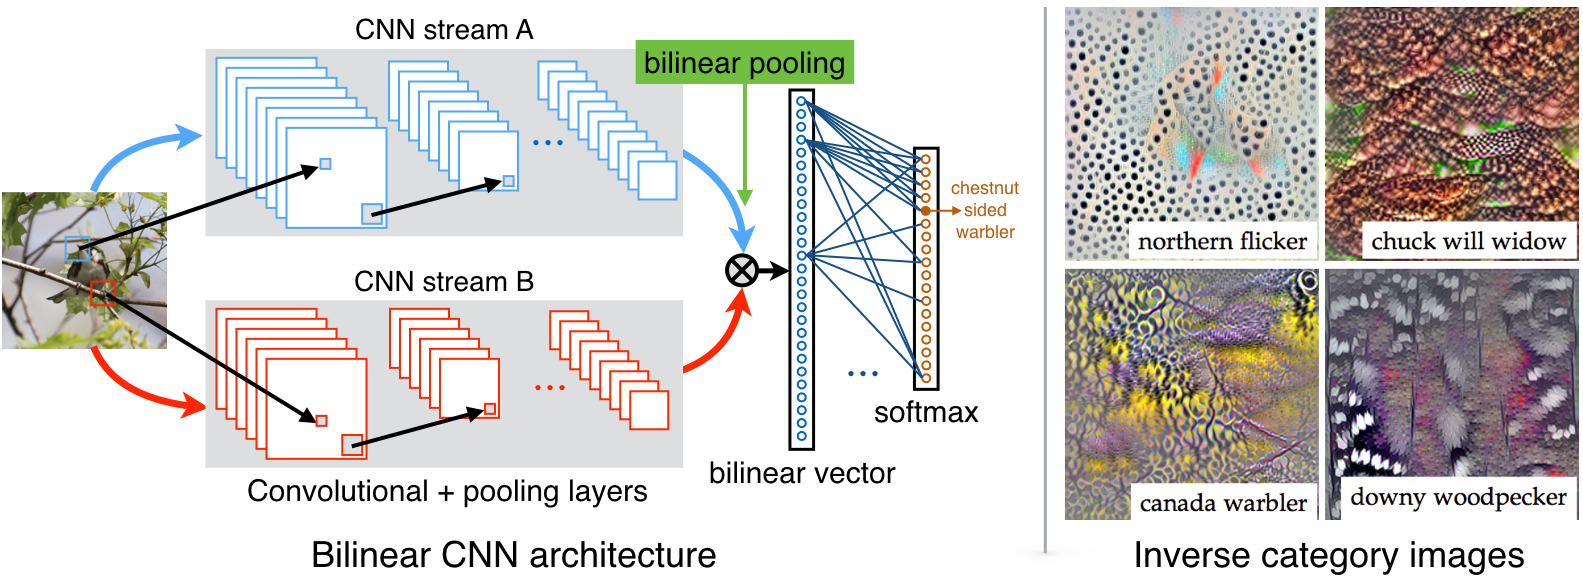
Bilinear CNN [1] is simple yet powerful model for Fine-Grained Visual Classification task. Here, B-CNN D-D model is implemented with keras.
For practical usage, we just need to invoke two functions transfer_learning() and fine_tuning() from main.py. In most cases, we should first invoke transfer_learning() to transfer the model to our target classes, then invoke fine_tuning() to fine tune all the layers.
Here’s a demo, we try to train a 4-class BCNN model. At the beginning, ensure all the requirements are poperly installed in the environment.
Firstly, the dataset should be prepared as follow.
./train|____ class1|____ class2|____ class3|____ class4./validation|____ class1|____ class2|____ class3|____ class4
After that, rewrite main.py or just import it.
import osTRAIN_DIR = './train'VALID_DIR = './validation'# Start transfer learningTENSORBOARD_DIR = './logs_tl'CHECKPOINT_DIR = './checkpoints'if not os.path.exists(TENSORBOARD_DIR):os.makedirs(TENSORBOARD_DIR)if not os.path.exists(CHECKPOINT_DIR):os.makedirs(CHECKPOINT_DIR)# Transfer the model to 4 classes, images and labels of# each class should be well prepared in train and validataion directory.transfer_learning(TRAIN_DIR,VALID_DIR,no_class=4,batch_size=64)# Start fine-tuningMODEL_WEIGHTS_PATH = './model_weights.h5'TENSORBOARD_DIR = './logs_ft'CHECKPOINT_DIR = './checkpoints'if not os.path.exists(TENSORBOARD_DIR):os.makedirs(TENSORBOARD_DIR)if not os.path.exists(CHECKPOINT_DIR):os.makedirs(CHECKPOINT_DIR)# Load the generated weights from transer learning,# then fine tune all layers.fine_tuning(TRAIN_DIR,VALID_DIR,model_weights_path=MODEL_WEIGHTS_PATH,no_class=4,batch_size=32,tensorboard_dir=TENSORBOARD_DIR,checkpoint_dir=CHECKPOINT_DIR)
tensorflow-gpu=1.10.0: any version that match you GPU, or simply the latest version of tensorflow for CPU.numpy=1.14.5: for scientific computing.opencv-python=4.0.0.21: for image resizing.h5py=2.6.0: for model weights saving.NOTE: Keras has its own methods for data augmentation, but the notebook has rewritten the preprocessing functions with center cropping and random cropping. Therefore, OpenCV is required in order to follow the source code. BTW, I haven’t test whether the rewritten functions are necessary or not.
[1] Lin T Y, RoyChowdhury A, Maji S. Bilinear cnn models for fine-grained visual recognition[C]//Proceedings of the IEEE International Conference on Computer Vision. 2015: 1449-1457. [pdf]
Deeply thanks BCNN_keras by tkhs3.
NOTE: Click README and BCNN_keras for details of the original souce codes.