Kong API Gateway Sidecar Image

 " class="reference-link">Kong Sidecar Image
This image uses Kong along with Kongfig and the External OAuth Plugin.
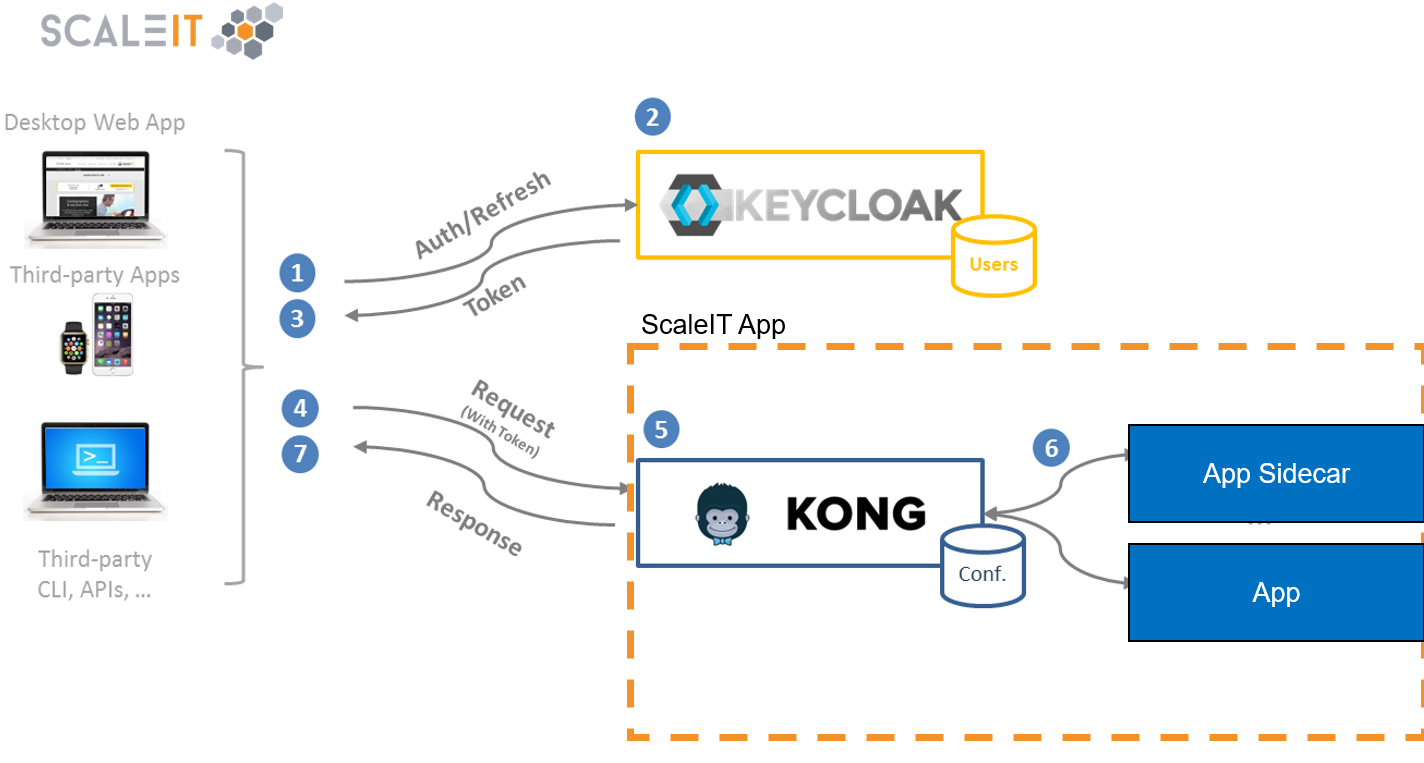
This Image is intended to be used as a socalled sidecar image. This means a new Kong instance is created for each app using kong in contrary to using Kong as a centralized load balancer. It also means that the Kong sidecar image has its own database and therefore user, security and other configuration which guarantees a lose coupling between an infrastructure’s stacks. This is also shown as a graphical representation below:
To reduce complexity in usage when launching the stack, config files can be provided so you don’t have to make API calls (or write your own scripts to do so).
Check out the example app here: https://github.com/ScaleIT-Org/sapp-example-oauth-ready-app
It is recommended to use docker-compose which makes it more easy to handle configurations. Please view this docker-compose.yml snippet below:
version: '2.1' # replace by any version needed (> 2.1)services:# <...> your main application/applications herekong-database:image: postgres:10.4-alpine # kong requires >9.5environment:- POSTGRES_USER=kong- POSTGRES_DB=kong- POSTGRES_PASSWORD=kongvolumes:- db-data:/var/lib/postgresql/datanetworks:- internalhealthcheck: # optionaltest: ["CMD", "pg_isready", "-U", "postgres"]interval: 10stimeout: 5sretries: 5kong:image: scaleit/kong-sidecar:0.14.0-0depends_on:kong-database:condition: service_healthy # only if healthcheck is enabledrestart: alwaysports:- 8000:8000- 8001:8001environment:- KONG_DATABASE=postgres- KONG_PG_HOST=kong-database- KONG_PG_DATABASE=kong- KONG_PG_PASSWORD=konglinks:- kong-database:kong-databasevolumes:- "./config:/config/apis"networks:- internalhealthcheck: # optionaltest: ["CMD-SHELL", "curl -I -s -L http://127.0.0.1:8000 || exit 1"]interval: 5sretries: 10volumes:db-data:networks:internal:# <...>
Consider replacing internal by your main application’s internal network and set the newest version for scaleit/kong-sidecar (latest should not be used in production). There is also an alpine variant of this image.
It is recommended to replace KONG_PG_PASSWORD and POSTGRES_PASSWORD by a more secure passphrase.
API Settings have the following format:
apis:- name: MyApp # unique api nameattributes:upstream_url: http://<your_app_url>hosts:- app.example.comuris:- /apppreserve_host: trueplugins:- name: rate-limiting # kong plugin nameattributes: # the plugin attributesusername: # optional, to reference a consumer, same as consumer_id in kong documentationconfig:
Example for using the External OAuth Plugin:
# <...> API configplugins:- name: external-oauthattributes:config.authorize_url: https://oauth.something.net/openid-connect/authorizeconfig.scope: openid+profile+emailconfig.token_url: https://oauth.something.net/openid-connect/tokenconfig.client_id: SOME_CLEINT_IDconfig.client_secret: SOME_SECRET_KEYconfig.user_url: https://oauth.something.net/openid-connect/userinfoconfig.user_keys: email,name,sconfig.hosted_domain: mycompany.cconfig.email_key: email
You can also add consumers to your Kong-sidecar instance:
consumers:- username: client-appcredentials:- name: key-auth # name of a specific credentials pluginattributes: # credential config attributes
You can create YAML files with names ending with .yml within any directory and define the settings to the container by defining a bind mount for the folder:
volumes:- "./<your_config_dir>:/config/apis"
Kong-sidecar will look for all YAML-files, like apis.yml or consumers.yml, in /config/apis and apply them.
Optionally you can also define JSON files, however YAML is recommended for a better readability.
After starting the stack, you should be able to reach your app by accessing http://localhost:8000/app.
API Settings should be edited in your apis.yaml file (or however you named it), so the settings are persistent even after container recreation and volume removal.
For a more advanced example go to Kongfig on Github.
Building the image is as easy as running docker build -t teco/kong-sidecar:0.12.1-0 . inside the directory where this repository is cloned. Be free to replace “0.12.1-0” with any tag that fits your needs.
Kong sidecar image version declarations follow the pattern <kong-version>-<kong_sidecar_image-patch> where <kong-version> is the semantic version of kong that is used and <kong_sidecar_image-patch> is a single number suggesting a patch respectively a fix for this image.
standard_init_linux.go: Common problem on windows. Convert line endings in the  exec user process caused "no such file or directory"
entrypoint.sh and apply-config.sh file to LF and the error will disappear.
“No kong-apis file found, skipping configuration.” although file provided:
Occurs on docker for Windows or docker for Mac. Sometimes files are mounted as empty directories. A restart of the daemon can help. Otherwise provide it via volume.
Nginx Logs show upstream sent too big header while reading response header from upstream even if proxy buffer is disabled:
Occurs if the external-oauth plugin is enabled and the user is redirected to the OAuth provider (or vice versa). OAuth2 fills the HTTP-header resulting in a header size which is too big to handle by the reverse proxy. Try to increase your proxy buffer as following:
proxy_buffer_size 16k;proxy_buffers 8 8k;proxy_busy_buffers_size 16k;