Language manager used to handle change app language without restart the app
![]()
A Language manager to handle changing the app language without restarting the app.
For SwiftUI please visit LanguageManager-SwiftUI
Youtube: iOS - Support multiple languages (Localization). 
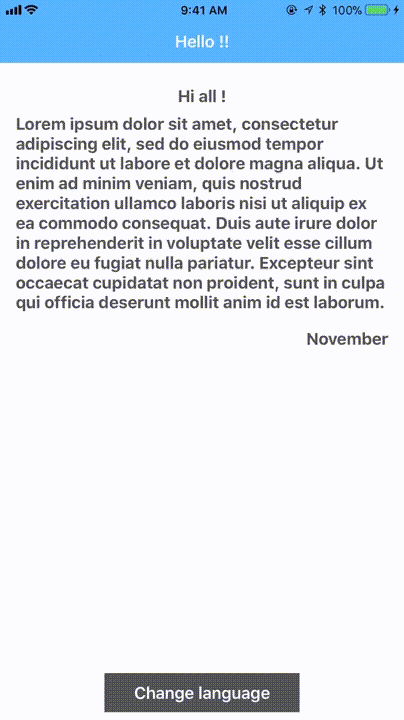
First of all, remember to add the Localizable.strings to your project, after adding the Localizable.strings file, select it then go to file inspector and below localization press localize, after that go to PROJECT > Localisation then add the languages you want to support (Arabic for example), a dialog will appear to ask you which resource file you want to localize, select just the Localizable.strings file.
Now, go to your storyboard and add UILable then add text to it, for example "Hello !", then go to your Localizable.strings file expand it, you will find Localizable strings file for English and Arabic, for English, add this line with the string you used in the UILabel inside the storyboard "Hello !" = "Hello !";
and for Arabic file : "Hello !" = "مرحبا !";
After that in the didFinishLaunchingWithOptions method inside the AppDelegate.swift file, set your default language that your app will run first time
LanguageManager.shared.defaultLanguage = .en // you can use .deviceLanguage to keep the device default language.
If you want to change the language use the setLanguage(language:) method by passing to it the new language
@IBAction func changeLanguage(_ sender: UIButton) {let selectedLanguage: Languages = sender.tag == 1 ? .en : .ar// change the languageLanguageManager.shared.setLanguage(language: selectedLanguage){ title -> UIViewController inlet storyboard = UIStoryboard(name: "Main", bundle: nil)// the view controller that you want to show after changing the languagereturn storyboard.instantiateInitialViewController()!} animation: { view in// do custom animationview.transform = CGAffineTransform(scaleX: 2, y: 2)view.alpha = 0}}
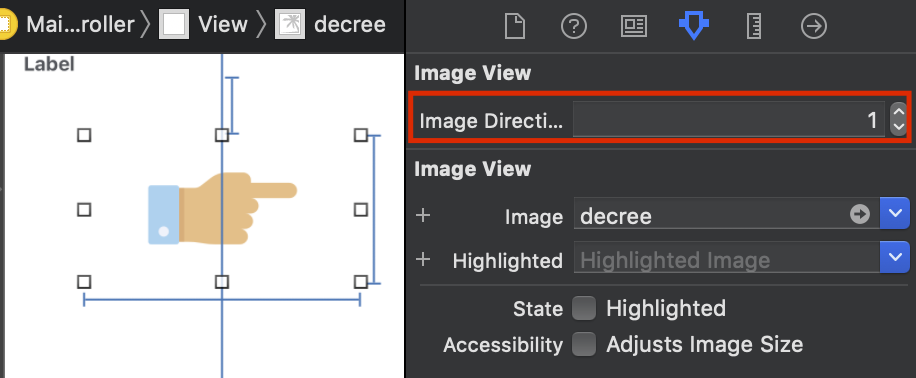
If you have an image and you want to change the direction of the image depending on the language, you can use image direction property, the property can be one of the following values:
-fixed: if the image must not change the direction depending on the language, you need to set the value as 0.
-leftToRight: if the image must change the direction depending on the language
and the image is left to right image then you need to set the value as 1.
-rightToLeft: if the image must change the direction depending on the language
and the image is right to left image then you need to set the value as 2.
Please check the example project to see how it works.
LanguageManager-iOS is available through CocoaPods. To install
it, simply add the following line to your Podfile:
pod 'LanguageManager-iOS'
Or you can use Carthage.
github "Abedalkareem/LanguageManager-iOS"
You can also use Swift Package Manager.
You can support this project by:
1- Checking my apps.
2- Star the repo.
3- Share the repo with your friends.
4- Buy Me A Coffee.
Facebook | Twitter | Instagram | @akdebuging">Youtube
