A docker project that sets up an NGINX server protected by 2-way SSL Verification (Mutual Authentication)
Proof of concept of implementing 2-way SSL Verification in NGINX (thus in any tech stack) demonstrated by using docker.
The dockerfile installs php and sets up a simple php server.
Ongoing research and development to implement trust stores
We’re trying to set up a secure way to create connections between servers. One way is to adapt Mutual Authentication similar to what J2EE servers do, but this time, implement it into something more generic that can support different platforms since NuWorks has PHP and NodeJS based applications. This is useful if you want to limit the users of a service and all the users are known in advanced.
Ongoing research and development effort for using this method in mobile applications so we can limit the users of APIs meant for use for mobile apps only.
After cloning, create a .env file based on the .env.example and fill in volume_path (which will likely contain the current folder where you placed this repository locally), and the ip you want it accessible (let’s say for ex. 192.168.13.1)
Create image, container, and run it with:
docker-compose builddocker-compose up -d
Try accessing via cUrl
curl --insecure https://192.168.13.1
This should result in an error message:
400 Bad Request
No required SSL certificate was sent
Note that we use —insecure since we’re only using a self signed certificate in our server’s SSL. This is fine as long as it’s only accessed internally by the organization. Just make sure to secure the generated ca.key file.
Generate a certificate
openssl req -x509 -nodes -days 365 -newkey rsa:2048 \-subj "/C=PH/ST=NCR/L=Pasig/O=NuWorks Interactive Labs Inc./OU=Tech Dept./CN=Unsigned Cert" \-keyout unsigned-cert.key -out unsigned-cert.crt
Try accessing via cUrl
curl --insecure --cert ./unsigned-cert.crt --key ./unsigned-cert.key https://192.168.13.1
This should result in an error message:
400 Bad Request
No required SSL certificate was sent
For demonstration purposes, this dockerfile is set to generate a signed certificate using the server’s CA (Certificate Authority). It’s located at /root/certs/client/
Copy the file via scp if this is in a real server with scp support
scp root@192.168.13.1:/root/certs/client/client.crt .scp root@192.168.13.1:/root/certs/client/client.key .
Or if in docker, just manually copy the files to outside the container by copying it the directory you set using volume_path to expose the files.
Test the connection using cUrl
curl --insecure --cert ./client.crt --key ./client.key https://192.168.13.1
Or create a pem file and use the combined certificate and key using
cat client.crt client.key > client.pemcurl --insecure --cert ./client.pem https://192.168.13.1
Both method should now work and output the response of this repository’s index.php file.
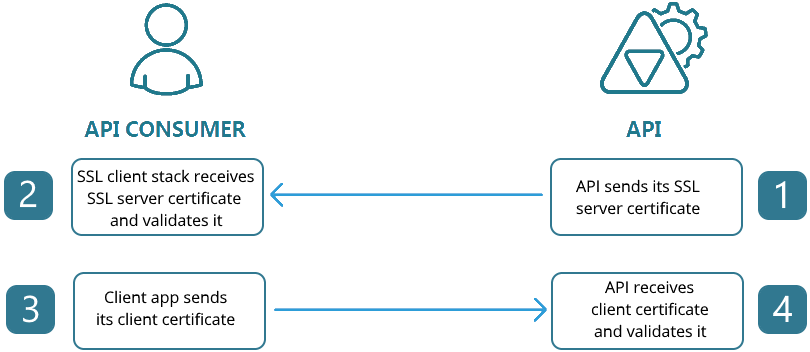
Now that we’ve proven Mutual Authentication using NGINX, let’s explore how it’s actually done.
A certificate authority (literally like Commodo CA) is a certificate that signs and validates other certificates.
We’ll have to create one on the server. For better readability, let’s create first an openssl.cnf file for our CA with the following contents:
[ req ]prompt = nodefault_md = sha1distinguished_name = req_distinguished_name[ req_distinguished_name ]C = PHST = NCRL = Pasig CityO = NuWorks Interactive Labs Inc.OU = TechDeptCN = TechDept CA[ certauth ]basicConstraints = CA:truesubjectKeyIdentifier = hashauthorityKeyIdentifier = keyid:always,issuer:always
certauth is an extension in openssl we can use for creating a custom certificate authority certificate.
In the terminal, we generate both the key and the certificate with:
openssl req -config /root/certs/root-ca/openssl.cnf -newkey rsa:2048 -nodes -keyform PEM \-keyout /root/certs/root-ca/ca.key -x509 -days 3650 \-extensions certauth -outform PEM -out /root/certs/root-ca/ca.crt
Note that you could also password protect the ca.key with -passout.
Create another openssl.cnf in the client machine or in another folder. This time, it’s for creating client certificates.
[ req ]prompt = nodefault_md = sha1distinguished_name = req_distinguished_name[ req_distinguished_name ]C = PHST = NCRL = Pasig CityO = NuWorks Interactive Labs Inc.OU = TechDeptCN = Client System[ client ]basicConstraints = critical,CA:FALSEkeyUsage = digitalSignature, keyEncipherment, dataEnciphermentextendedKeyUsage = clientAuth
Then generate the request to create a certificate and its key in the terminal with:
openssl genrsa -out /root/certs/client/client.key 2048openssl req -config /root/certs/client/openssl.cnf -new \-key /root/certs/client/client.key -out /root/certs/client/client.req
Keep the client.key file safe. Send/copy the client.req file to the server with the certificate authority so it can be signed and a certificate can be created. In the example below, it’s copied in the folder /root/certs/client
In the server, sign the request with:
openssl x509 -req -in /root/certs/client/client.req \-CA /root/certs/root-ca/ca.crt -CAkey /root/certs/root-ca/ca.key \-extfile /root/certs/client/openssl.cnf -extensions client -days 365 -outform PEM \-out /root/certs/client/client.crt -CAcreateserial -CAserial /root/certs/client/serial.seq
Once the client.crt is generated, give it back to the client server/machine.
With both the crt and key files, you may now try connections to the server as demonstrated in the proof of concept.
You don’t have to sign the crt and key file of the actual server. This should be done by certificate authorities (like Commodo CA) and not the CA’s you create.
Changing the CA automatically revokes the certificates of all the clients. They will have to create requests and have you sign them again.
This can also be done directly in Apache should you wish to do so. You will just have to set the following on the apache server:SSLCACertificateFile
SSLVerifyClient
SSLVerifyDepth