Powerful button tools for managing various button events of standalone button or button array.
Powerful button tools for managing various button events of standalone button or button array. Tested on ESP32 and should also work on Arduino too.
ButtonFever is upgrade version of MultiButton library, provide much powerful button features.
BfButton class handled standalone button debouncing, trigger callback function for single press, double press, and long press events. The class can distinguish different pressing pattern and trigger corresponding callback, i.e. single press vs double press.
BfButtonManager class manage multiple buttons with single analog pin. The class also provide printReading() method for you to check the analog pin reading. In theory you may add more buttons in the circuit.
BfButton class can be used alone to handle press event of a single digital button.
Include BfButton class
#include <BfButton.h>
Create button object
BfButton(button_mode_t mode, uint8_t pin, bool pullup=true, uint8_t buttonLogic=LOW);
By default, the object will use internal pullup of the board, but you may also use external pullup/pulldown as example you concern, e.g. awake from deep sleep mode using button.
Parameters:
Parameter | Description
———————————————|——————
button_mode_t mode | Declare button mode. Assign BfButton::STANDALONE_DIGITAL for standalone digital button.
uint8_t pin | GPIO of the button
bool pullup=true | Use internal pullup
uint8_t buttonLogic=LOW | Button logic. Possible value: HIGH (pulldown) or LOW (pullup, default)
const unsigned int btnPin = 12;BfButton btn(BfButton::STANDALONE_DIGITAL, btnPin, false, HIGH); // using external pulldown
Declare button callback
Button callback must contain 2 parameters:
Parameter | Description
—————————————|——————
BfButton *btn | BfButtons object itself
BfButton::press_pattern_t pattern | Press pattern of the event. Possible value:
You may declare different callback for different press pattern, or you may use single callback for all pattern.
void pressHandler (BfButton *btn, BfButton::press_pattern_t pattern) {Serial.print(btn->getID());switch (pattern) {case BfButton:Serial.println(" pressed.");break;case BfButton:Serial.println(" double pressed.");break;case BfButton:Serial.println(" long pressed.");break;}}
In setup() of the sketch, assign callback for button press events
void setup() {btn.onPress(pressHandler).onDoublePress(pressHandler) // default timeout.onPressFor(pressHandler, 1000); // custom timeout for 1 second}
BfButton& onPress ( callback_t callback )
Single press event handler
BfButton& onDoublePress ( callback_t callback, unsigned long timeout=300 )
Detect double press within timeout.
BfButton& onPressFor ( callback_t callback, unsigned long timeout=3000 )
Trigger long press event when continue pressed for a while (ie. timeout).
In loop() of the sketch, read button status.
void loop() {btn.read();}
#include <BfButton.h>const unsigned int btnPin = 12;BfButton btn(BfButton::STANDALONE_DIGITAL, btnPin, false, HIGH); // I added a pulldown myselfvoid pressHandler (BfButton *btn, BfButton::press_pattern_t pattern) {Serial.print(btn->getID());switch (pattern) {case BfButton::SINGLE_PRESS:Serial.println(" pressed.");break;case BfButton::DOUBLE_PRESS:Serial.println(" double pressed.");break;case BfButton::LONG_PRESS:Serial.println(" long pressed.");break;}}void setup() {Serial.begin(115200);while (!Serial);Serial.println();btn.onPress(pressHandler).onDoublePress(pressHandler) // default timeout.onPressFor(pressHandler, 1000); // custom timeout for 1 second}void loop() {btn.read();}
BfButtonManager class manage multiple buttons with single analog pin.
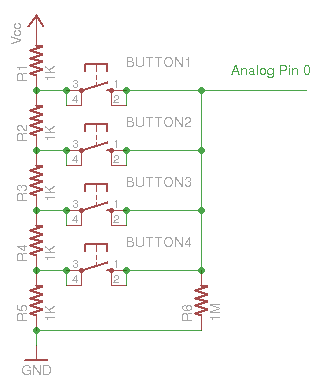
To determin voltage range for each button in the array, you may check the actual readings with printReading() method.
The following sketch calculate the avarage reading of a button from 5 readings:
#include <BfButtonManager.h>uint16_t reading, avg;uint16_t sum = 0;const unsigned int pin = 35;void setup() {Serial.begin(115200);while (!Serial);Serial.println();}void loop() {static unsigned int i = 0;reading = BfButtonManager::printReading(pin);if (reading > 100) { // button pressedsum += reading;if (i == 4) {avg = sum / 5;Serial.print("Avarage Reading: ");Serial.println(avg);sum = 0;}i++;if (i > 4) i = 0;} else { // button releasedsum = 0;i = 0;}delay(200);}
NOTE: Readings of analog pin may vary upon other connected devices. Voltage ranges for each button should determin based on measurement of the final circuit with all required devices initialized.
Include BfButton class and BfButtonManager class
#include <BfButtonManager.h>#include <BfButton.h>
Create button manager object
BfButtonManager(uint8_t pin, uint8_t btnNum);
Parameters:
Parameter | Description
————————-|——————
uint8_t pin | Analog pin of the button array
uint8_t btnNum | Number of buttons in the array
const unsigned int btnPin = 35;BfButtonManager manager(btnPin, 4);
Create button objects and assign an ID for the button
BfButton(button_mode_t mode, uint8_t id);
Parameters:
Parameter | Description
———————————————|——————
button_mode_t mode | Declare button mode. Assign BfButton::ANALOG_BUTTON_ARRAY for button in button array.
uint8_t id | ID of the button
BfButton btn1(BfButton::ANALOG_BUTTON_ARRAY, 0);BfButton btn2(BfButton::ANALOG_BUTTON_ARRAY, 1);BfButton btn3(BfButton::ANALOG_BUTTON_ARRAY, 2);BfButton btn4(BfButton::ANALOG_BUTTON_ARRAY, 3);
Declare button callback
(see above: Standalone Button Usage)
In setup() of the sketch, assign callback to events
(see above: Standalone Button Usage)
In setup() of the sketch, add button to button manager and provide the voltage range of the button
BfButtonManager& addButton(BfButton* btn, uint16_t minVoltageReading, uint16_t maxVoltageReading);
Parameters:
Parameter | Description
—————————————-|——————
BfButton* btn | Button object
uint16_t minVoltageReading | Minimum voltage reading of the button
uint16_t maxVoltageReading | Maximum voltage reading of the button
manager.addButton(&btn1, 3000, 3150);
In setup() of the sketch, initialize button manager for reading analog pin
manager.begin();
In loop() of the sketch, update button state
void loop() {manager.loop();}
#include <BfButtonManager.h>#include <BfButton.h>const unsigned int btnPin = 35;BfButtonManager manager(btnPin, 4);BfButton btn1(BfButton::ANALOG_BUTTON_ARRAY, 0);BfButton btn2(BfButton::ANALOG_BUTTON_ARRAY, 1);BfButton btn3(BfButton::ANALOG_BUTTON_ARRAY, 2);BfButton btn4(BfButton::ANALOG_BUTTON_ARRAY, 3);void pressHandler (BfButton *btn, BfButton::press_pattern_t pattern) {Serial.print(btn->getID());switch (pattern) {case BfButton::SINGLE_PRESS:Serial.println(" pressed.");break;case BfButton::DOUBLE_PRESS:Serial.println(" double pressed.");break;case BfButton::LONG_PRESS:Serial.println(" long pressed.");break;}}void setup() {Serial.begin(115200);while (!Serial);Serial.println();btn1.onPress(pressHandler);btn1.onDoublePress(pressHandler);btn1.onPressFor(pressHandler, 2000);manager.addButton(&btn1, 3000, 3150);btn2.onPress(pressHandler);btn2.onPressFor(pressHandler, 1500);manager.addButton(&btn2, 2190, 2350);// You may change event handler methods in any order!btn3.onPressFor(pressHandler, 1000).onPress(pressHandler).onDoublePress(pressHandler, 300);manager.addButton(&btn3, 1390, 1550);btn4.onPress(pressHandler);manager.addButton(&btn4, 600, 750);manager.begin();}void loop() {manager.loop();}
BfButton classuint8_t getID ()
Return button pin number for digital button, or ID for button in button array.
uint8_t getPin ()
Alias of getID().
BfButtonManaget classBfButtonManager& setADCResolution ( uint16_t resolution )
Set resolution for ADC. The library will set build-in ADC for Arduino and ESP32 by default.
static uint16_t printReading ( uint8_t pin )
Print analog pin reading through Serial port and return the reading.
int reading = MultiButtons::printReading(14);
Vout = Vin(R2/R1+R2)
Vin = 3.3V # ESP32
R1+R2 = 5KΩ = 5000Ω
0 ~ 3.3V = 0 ~ 4095
3.3V/4095 = 0.81mV
| Button | MultiMeter Measurement | Expected Value |
|---|---|---|
| 1 | 2.62V | 3259 |
| 2 | 1.96V~1.97V | 2420~2432 |
| 3 | 1.30V~1.31V | 1605~1617 |
| 4 | 0.65V | 802 |
It is required an adjustment for ESP32 ADC with the following equation:
Vout = e / 4095.0 * 3.3 + 0.1132
| Button | Circuit Measurement | Serial Debug Data | Calculated Voltage w’ Adjustment |
|---|---|---|---|
| 1 | 2.61V | 3070~3103 | 2.59V~2.61V |
| 2 | 1.95V~1.96V | 2237~2255 | 1.92V~1.93V |
| 3 | 1.30V | 1456~1461 | ~1.29V |
| 4 | 0.64V~0.65V | 658~664 | 0.64V~0.65V |


